
How to Actually Buy a Stock on Interactive Brokers (Step-by-step Guide)
Hey, please read the financial disclaimer below before reading this.*
Okay, so the money is in your account, it’s been converted to Dollars, and you know what you want to buy. Now comes the moment of truth: actually clicking the buttons to buy a stock.
This part can seem super overwhelming at first because the screen looks like something out of a NASA control room. But don’t worry. It’s actually not confusing at all once you know the 2 or 3 things you need to click.
Once you learn this, you can buy any stock you want, and you’ll save thousands (if not hundreds of thousands) of Shekels over the long term compared to paying a bank or broker to do this for you.
Here is the step-by-step guide to buying your first stock.
Step 1: Search for the Ticker
Every stock has a code called a “Ticker.” This is a short series of letters that keeps it unique across all the exchanges in the world.
-
You are going to go to the search bar.
-
Type in the ticker of the stock you want. (For my S&P 500 strategy, I search for VUAA).
-
Click on the stock when it appears.
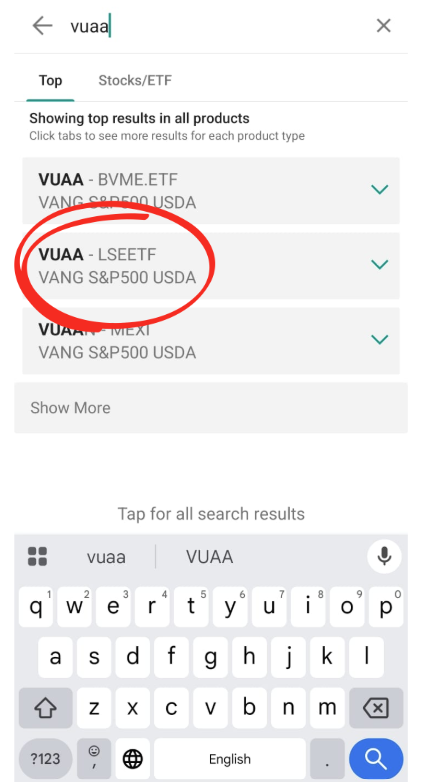
Screenshot from IBKR. Search for VUAA
Note: I have circled the correct VUAA that I want, that is listed on the London Stock Exchange (LSE). You can see next to it there is a dash and the stock exchange it is listed on LSEETF . I don’t want the one listed on BVME (Italian stock exchange) or the MEXI (Mexican stock exchange).
Step 2: The “Control Room” Screen
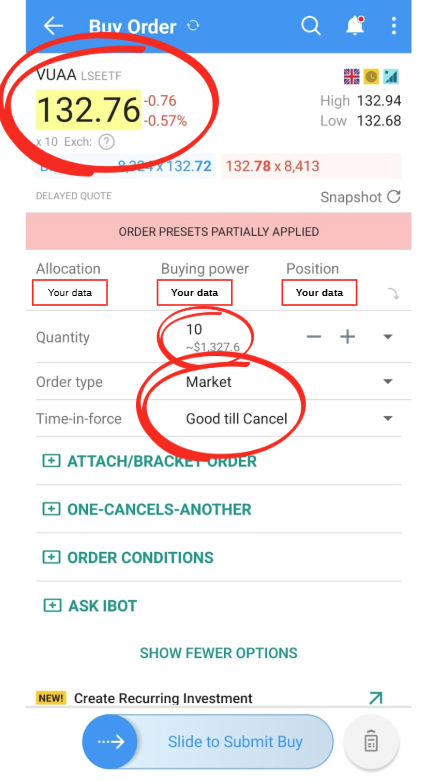
You will land on a screen with a bunch of details, charts, and numbers. In the top left, you’ll see the current price of the stock. In the screenshot below you can see that the price was $132.76 at that time.
You will also likely see your Available Balance or Buying Power. This tells you how much money you have ready to spend. You’ll also see Position, which is just how many individual stocks of this stock you already own. On the first time buying, it will be 0.
Now, click the blue Buy button. This will open the order screen. It looks like the below, and I’ll explain each section.
I recommend to have these settings for when you’re starting out and just buying S&P500.
Step 3: Set Your Quantity
The first thing it asks is: How many do you want?
You can calculate the maximum amount you can buy using:
-
Your available cash balance.
-
The current price of the stock.
For example, if the stock costs $100 and you have $3,000, you can buy 30 shares. You want to make sure the Quantity x Price is less than or equal to the money you have available.
Step 4: Choose Your “Order Type”
This is where people get confused. There are two main types you need to know about:
1. Market Order (Recommended for most people)
This basically says: “I want to buy this stock right now at whatever the current price is.”
-
Best for: Buying big, stable things like the S&P 500 (ETFs) where the price doesn’t jump around wildly in seconds.
-
Why use it: It’s simple, it’s fast, and it guarantees you get the stock.
2. Limit Order
This basically says: “I am willing to buy this stock, but ONLY if the price is $X or less.”
-
Best for: Individual stocks that are very volatile (jumping up and down 10-30% in a day).
-
Why use it: It protects you from accidentally paying too much if the price spikes suddenly.
-
The Catch: If the price never drops to your limit, you won’t buy the stock at all.
My Advice: If you are just buying a standard index fund like the S&P 500, a Market Order is usually fine.
Step 5: “Time in Force” (How long should this order last?)
The system will ask you how long this instruction is valid for.
-
Day: This means, “Try to buy this today. If you can’t do it by the time the market closes, just cancel the order.” This is largely used for day traders, not long term investors like us.
-
GTC (Good ‘Till Cancel): This means, “Keep this order open forever until I tell you to stop.” (Usually, the system will auto-cancel it after a few months if nothing happens).
I usually just set it to GTC.
Step 6: Swipe to Buy
Once you’ve set the Quantity and the Order Type, you just swipe (on mobile) or click (on desktop) to Submit Buy Order.
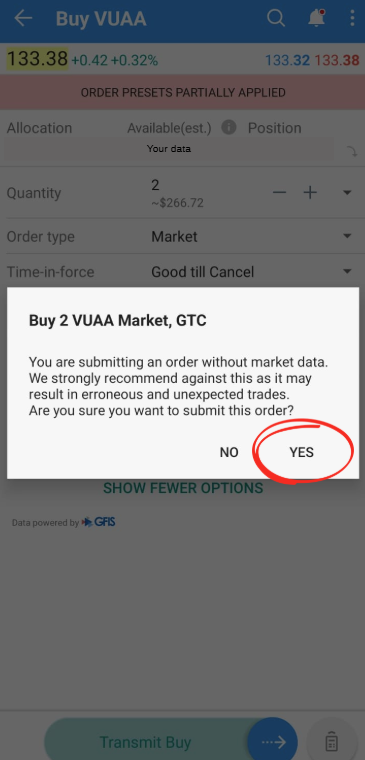
Don’t Panic if you see these warnings:
-
“Submitting without market data”: IBKR might warn you that you don’t have a paid subscription for live data. That’s fine. As long as you checked the price and are happy with it, you can click “Yes” or “Accept.”
-
“Trading Hours”: If you are in Israel, you are likely doing this during the day, but the US market opens in the evening (Israel time). The system might say the market is closed. You can just click “Yes” to queue the order, and it will execute automatically as soon as the market opens in New York.
You’re Done!
Once the market is open and the price matches, your order will Execute.
You can go to your Portfolio tab, and you will see your new stocks sitting there.
Congratulations, you are now an investor.
Bonus Example: Buying a Single Stock (Like Apple)
While I mostly recommend buying the whole market (S&P 500), sometimes you just want to own a piece of a specific company you love, like Apple or Tesla. It starts with the same process of searching their ‘ticker’ like AAPL for Apple and selecting the stock you want to buy. You can just Google or use ChatGPT for help with this.
Individual stocks are more volatile (jumpy) than big index funds, so I recommend being a little more specific with your settings.
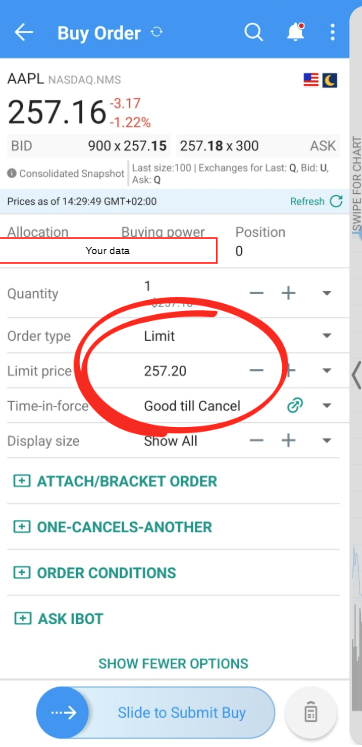
Take a look at the screenshot above.
This is an order for 1 share of Apple (AAPL). Here is exactly why I set it up this way, and why I recommend you do the same for individual stocks:
1. Order Type: “Limit”
Unlike the S&P 500 which is generally stable, individual stocks can jump up or down significantly in seconds.
-
By choosing Limit, I am setting a hard ceiling. I am telling Interactive Brokers: “I want this stock, but I am not willing to pay more than X.”
2. Limit Price: A Few Cents Above the Current Price
If you look closely at the image, the stock is trading around $257.16 but I set my Limit Price to $257.20.
Why? This is a little trick. If I set the limit exactly at the current price, the price might move up by one cent a second later, and my order won’t go through.
By setting the limit a few cents higher, I am virtually guaranteeing that the order executes immediately, but I am still protecting myself from a massive price spike. It’s the perfect balance of speed and safety.
3. Time-in-force: “Good till Cancel”
I almost always use this for individual stocks. If the market is closed right now, or if the price spiked and my order didn’t catch, I don’t want the order to disappear at the end of the day. I want it to sit there and wait until the price is right.
You’ve Got This
I know looking at all these steps and screenshots might feel heavy right now. It feels like learning a new language. But trust me, after you do this once or twice, it will feel boringly simple.
The most important thing is that you are now officially in control of your own financial future. You understand how the machine works. And the best part? You aren’t paying an investment manager thousands of Shekels a year just to click these few buttons for you. That money stays in your pocket, compounding for your future.
*I am not a financial advisor or licensed professional. I am just a normal guy sharing my personal experience and opinions for entertainment and informational purposes. This should not be read as financial advice. If you want actual financial advice, please go to a licensed, registered service provider. I highly recommend speaking to Blue and White Finance (I’m not affiliated with them at all, they are just excellent and will be able to put you on the right track.)